Building a Sofle keyboard
Apr 8, 2021After considering my options for a little while, I decided to build myself a split ergonomic keyboard. I’m used to a 60% board, so my decision making process came down to three main things: 1. what’s similar to them and 2. what will work with my Royal Navy DSA keycaps (i.e. standard key sizes) and 3. what uses QMK firmware? I settled on making a Sofle board, with a custom layout, tweaked for my left-handed weird typing.
Picking a board
As I said above, I wanted a board a bit like my 60% board, and certainly nothing too much smaller. I’ve played a bit with ortholinear boards but wasn’t keen, I and decided that things like the katana60, while cool, were just not different enough to be interesting here. My colleague Vasko has an Iris board which looks close to perfect, except I like the idea of the bottom row being more standardised1. After whittling down my choices based on size and layout I was really only left with the lily58 and Sofle, and I picked the Sofle because it has rotary encoders, and they looked fun!
So, with that decided I looked into how to get one, including pricing having PCBs made by JLCPCB. This would have given me the boards and top and bottom plates for about 22 GBP plus delivery, so not bad, but I wanted acrylic plates, and I’m impatient. While I was trying to work out how to get plates I discovered that mechboards sell kits, so at that point I decided to just get that. In addition to the kit I bought some pro-micro clones and a braided USB cable from Amazon. Sourcing the bits from elsewhere might have saved a little, but not much (the original author provides full details). I also settled on Cherry Brown switches and bought them at the same time. Here’s what I ended up with, if you’re interested in more details, read on:
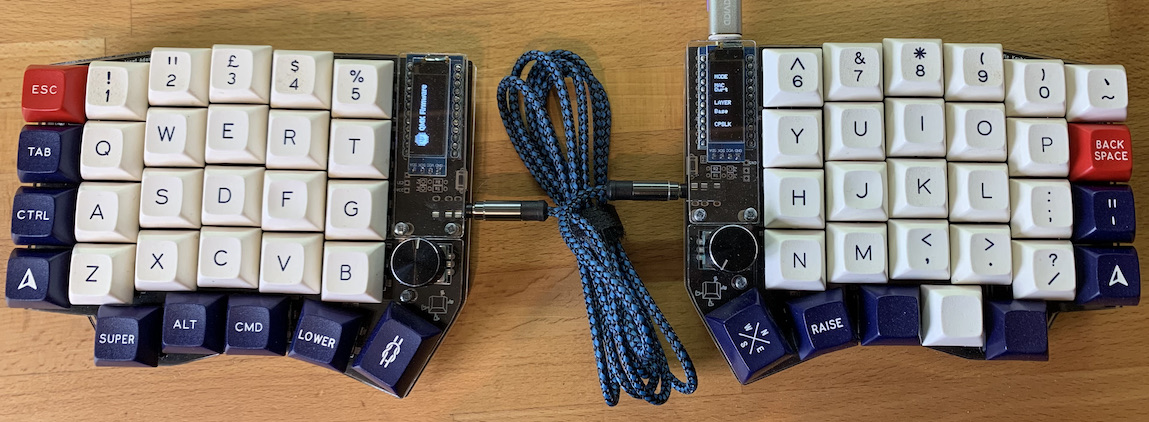
My custom Sofle keyboard
Building
I’m no stranger to soldering and I followed the build guide, finding it pretty easy. I have a cheap hot air soldering station so I used that for the diodes, which sped things up a lot. The other bits just go on as normal, so just take your time and make sure you don’t miss any switch sockets (like I did!). If you haven’t soldered before then try some through-hole projects first! The boards are identical, and Josef’s trick of marking the tops with tape is a good one, you don’t want to accidentally populate the wrong side of one.
The kit didn’t include headers or sockets for the micros or screens, so I soldered them directly to the PCBs. If you are likely to want to switch them out then it would be worth using sockets, but you’ll increase the height of the screens, and clone pro-micros are really cheap unless you spring for USB-C connectors, so I don’t think it’s worth it. As I said, just follow the build guide and you’ll be done pretty quickly, the guide even has basic instructions on flashing QMK.
Firmware
The first thing I realised when I tried the default layout is that I hit the
space bar with my left thumb, so having enter there was a big no! The next
thing I noticed is that the arrows were optimised for a right-hander and so on
the right half2, and then I noticed that I wanted escape at the top left,
and tab underneath. From there, I quickly decided to have control where caps
lock would normally be and to give myself a hyper key on the bottom left.
Another oddity is that I rarely use the GUI and control keys on the right, so I
decided to leave most of that. Finally, while they are easily togged via the
default firmware I like to have GUI (cmd) on the inside, close to space, with
alt next.
With all these seemingly arbitrary constraints in place I set about messing with the firmware, and came up with this:
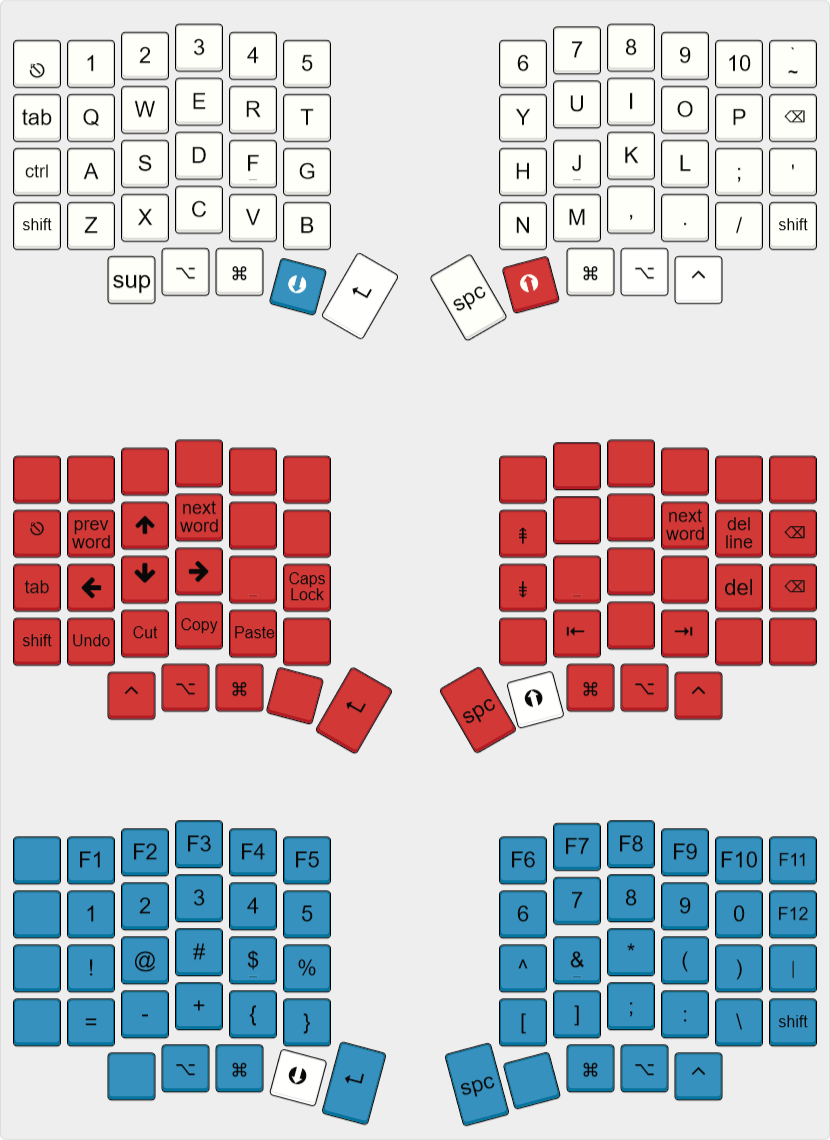
My custom layout
As you can see I’ve yet to decide what to do with the right hand side, but that’s no big deal. While I was messing with the firmware I also added a custom logo to the left display (the secondary) and tweaked the detection for the primary because it wasn’t working, resulting in only one side doing anything.
My custom logo is just a left hand, drawn in pixelmator and then converted to an array of bytes with image2cpp. As you can see, pixel art isn’t my forte!

Keyboard logo
I’ve put my keymap on
GitHub, and you can grab it
by checking it out into keyboards/sofle/keymaps in a clone of QMK:
git clone git@github.com:mattfoster/sofle-lefty-keymap.git lefty
then build/flash with make sofle:lefty:flash in the root.
Training and muscle memory
I built this a few weeks ago, and while I’m getting better, I’m still not used to using it! Mostly because I’m an awful touch-typist and use the wrong fingers for some letters, and partly because I use my left hand too much!
It’s not quite my daily driver yet, and when work is not too busy I’m gradually ramping up my use, which is helping a lot, and I expect to be used to it soon. Having to use layers for symbols slows me down a lot, so I’m considering printing a diagram. Also, the boards are a lot lighter than my 60%, which has a chunky case, so they don’t feel as sturdy and I’m considering getting a metal base cut. But, I’d also like to tilt them if I can work out how… so many options. Overall, I have no regrets, this has turned into a fun project.