WSJT-X and Raspberry Pi
May 2, 2020Back in January 2018, just after I got my foundation callsign – M6PUH – I
set up a Raspberry Pi connected to an Icom IC-706MkII to run WSJT-X and play
with FT8, the data mode everyone loves to hate. I ignored a lot of the random
advice I saw about using expensive radio-specific sound interfaces and tried to
get a cheap and reliable setup. Well, two years later the setup still works, I
have a full license (M0PUH) and as I’ve just got a Raspberry Pi 4 and set
that up I thought I’d document the process.
Interface Hardware
After the Raspberry Pi, the most expensive part of this setup is a Radioarena cable for PTT and audio. This is a £25 USB to serial adapter which triggers the radio’s PTT connection as well line in and out cables, all of these are connected to the right type of DIN plug for the radio. After using this for a couple of years it’s my view that you could definitely make one of these pretty cheaply, if you could source a connector.
Next is a £6.50 USB sound interface. I read an interesting analysis of WSJT-X use with different USB soundcards which mentioned that K1JT believes that choice of sound card makes no real difference. It’s also makes various recommendations, which I ignored in favour of saving money 😁.
Finally, I have a DIY CAT cable made with an FTDI breakout board. You can get cheap versions of these from China for <£1.50! See this one for example, but I’m using an Elektor BoB because I had one to hand. There’s not much to it, but I can’t find the original guide I followed when making this. Still, I have this awful photo:
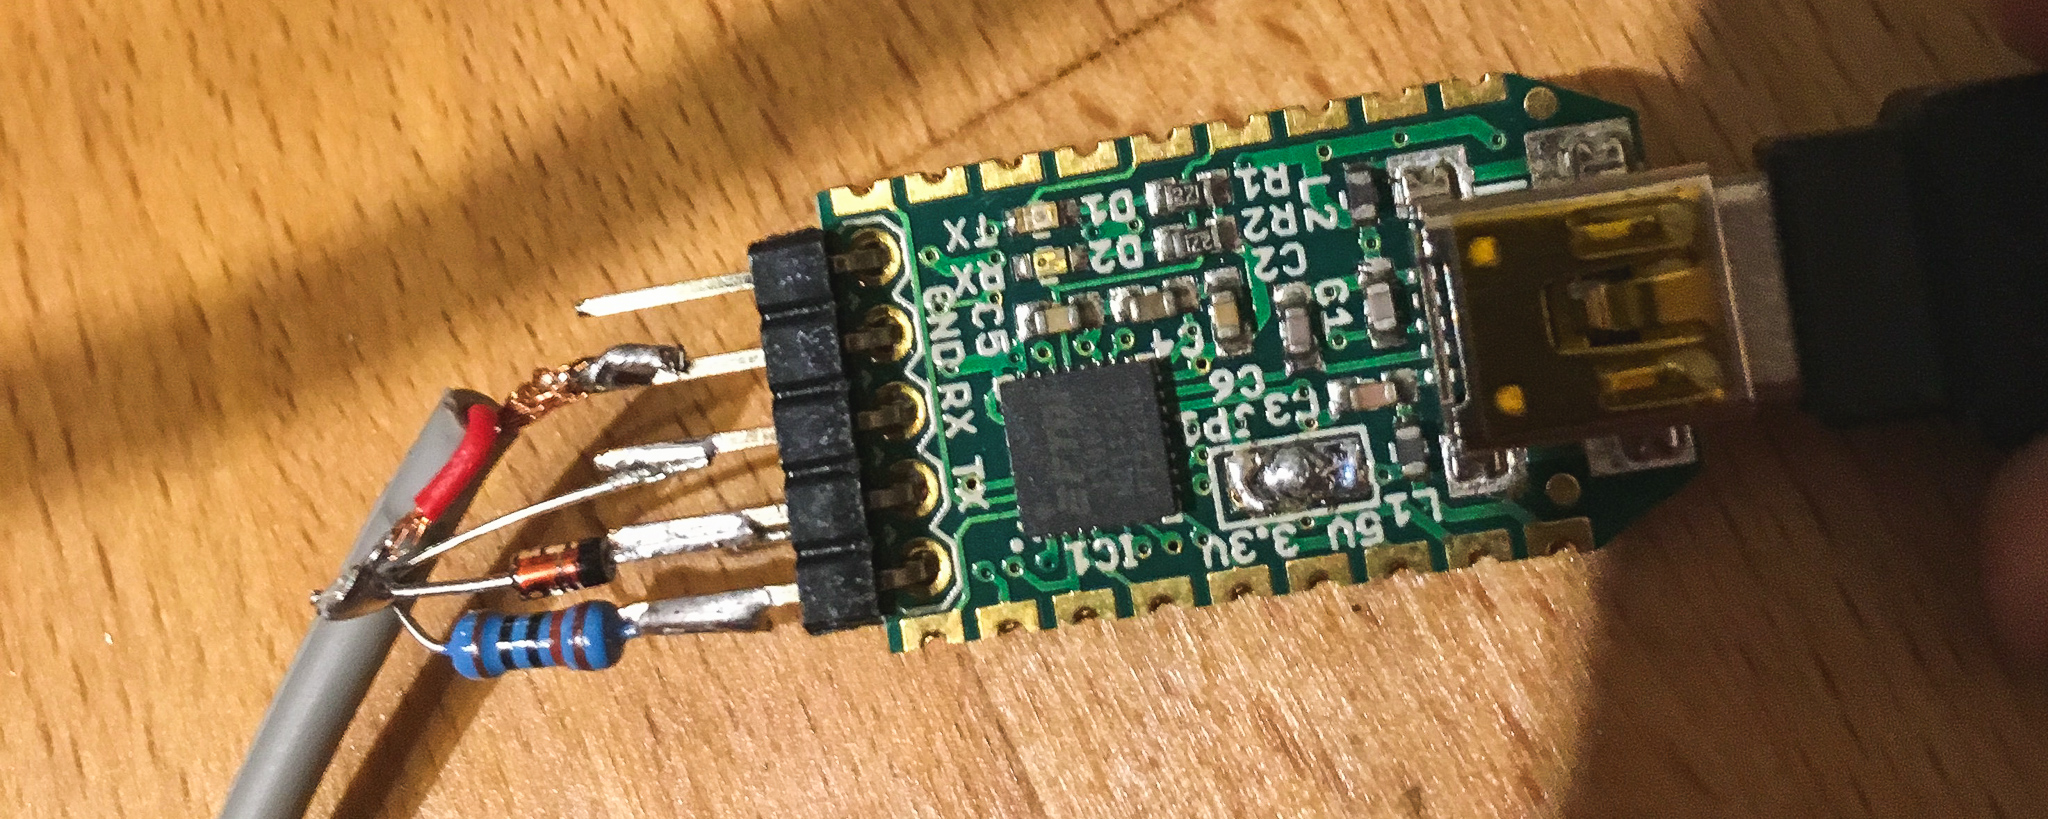
So you can see there’s a diode with the cathode connected to TX and the anode to RX, plus a resistor to Vcc (according to the pinout. I’d recommend searching the web before building one yourself!
Once you have all these bits and bobs ready you can move onto setting up the Pi. At this point I’d leave everything disconnected, and you’ll see why below.
Software Setup
I’m going to assume your Pi is ready to go and in a box. You should install the latest Raspbian, and make sure you have a working internet connection.
Next, visit the WSJT-X
homepage and
download the latest release for Raspbian. For me, that was
wsjtx_2.1.2_armhf.deb. The site says this is for Strech, but it also works
for Buster, the latest Debian/Raspbian release at the time of writing.
Have a read through the user guide and you’ll see some installation instruction. They didn’t work for me, so instead, I installed WSJT-X by opening a terminal and running:
cd Downloads
sudo dpkg -i wsjtx_2.1.2_armhf.deb
sudo apt --fix-broken install
The last command there is able to determine which dependencies are missing and install them for you. In my case, the list was:
libgfortran3 libqt5multimedia5 libqt5multimedia5-plugins libqt5multimediagsttools5 libqt5multimediaquick5 libqt5multimediawidgets5 libqt5opengl5 libqt5qml5 libqt5quick5 libqt5serialport5`
So:
sudo apt install libgfortran3 libqt5multimedia5 libqt5multimedia5-plugins libqt5multimediagsttools5 libqt5multimediaquick5 libqt5multimediawidgets5 libqt5opengl5 libqt5qml5 libqt5quick5 libqt5serialport5
Would have worked instead of the above. Next, see if WSJT-X starts up by typing
wsjtx in your terminal. You’ll probably have to click through some errors
telling you that sound is not setup. That’s to be expected at this point.
We now have three jobs to do:
- find the device responsible for CAT control and configure it
- find the device responsible for PTT and configure it
- setup audio.
CAT control
Start by opening another terminal or new terminal tab, and run lsusb. At this
point nothing should be plugged in aside from your normal peripherals. i.e.,
nothing attached to you radio and no USB sound interfaces.
The output for lsusb looks like this for me (I have a Logitech receiver and a
DIY keyboard):
pi@raspberrypi:~/Downloads $ lsusb
Bus 002 Device 001: ID 1d6b:0003 Linux Foundation 3.0 root hub
Bus 001 Device 003: ID 046d:c52b Logitech, Inc. Unifying Receiver
Bus 001 Device 004: ID feed:6060
Bus 001 Device 002: ID 2109:3431 VIA Labs, Inc. Hub
Bus 001 Device 001: ID 1d6b:0002 Linux Foundation 2.0 root hub
Now plug in the USB device which controls your rig, and run lsusb again. You
will see another device.
Bus 002 Device 001: ID 1d6b:0003 Linux Foundation 3.0 root hub
Bus 001 Device 006: ID 0403:6001 Future Technology Devices International, Ltd FT232 Serial (UART) IC
Bus 001 Device 005: ID 0bda:5411 Realtek Semiconductor Corp.
Bus 001 Device 003: ID 046d:c52b Logitech, Inc. Unifying Receiver
Bus 001 Device 004: ID feed:6060
Bus 001 Device 002: ID 2109:3431 VIA Labs, Inc. Hub
Bus 001 Device 001: ID 1d6b:0002 Linux Foundation 2.0 root hub
Here, I plugged in both a hub and the CAT control line and so have two new
entries. The serial UART (Bus 001 Device 006: ID 0403:6001 Future Technology Devices International, Ltd), is the interesting one here. If you run dmesg -H and scroll to the bottom (press G), you’ll see something like this:
[May 1 20:59] usb 1-1.3.2: new full-speed USB device number 6 using xhci_hcd
[  +0.152570] usb 1-1.3.2: New USB device found, idVendor=0403, idProduct=6001, bcdDevice= 6.00
[  +0.000018] usb 1-1.3.2: New USB device strings: Mfr=1, Product=2, SerialNumber=3
[  +0.000014] usb 1-1.3.2: Product: FT232R USB UART
[  +0.000012] usb 1-1.3.2: Manufacturer: FTDI
[  +0.000012] usb 1-1.3.2: SerialNumber: A600CS2N
[  +0.063095] usbcore: registered new interface driver usbserial_generic
[  +0.000043] usbserial: USB Serial support registered for generic
[  +0.007208] usbcore: registered new interface driver ftdi_sio
[  +0.000050] usbserial: USB Serial support registered for FTDI USB Serial Device
[  +0.000300] ftdi_sio 1-1.3.2:1.0: FTDI USB Serial Device converter detected
[  +0.000131] usb 1-1.3.2: Detected FT232RL
[  +0.003006] usb 1-1.3.2: FTDI USB Serial Device converter now attached to ttyUSB0
So you can see it has been assigned to the device /dev/ttyUSB0 and that its
serial number is A600CS2N.
We could set WSJT-X to use this device based on that first bit of information
(the device name), but to make our config robust to changes in the order we
plug things in it’s best to find the persistent name. To do that, run ls /dev/serial/by-id/, for me that looks like:
pi@raspberrypi:~ $ ls /dev/serial/by-id/
usb-FTDI_FT232R_USB_UART_A600CS2N-if00-port0
Yours will differ depending on the adapter chipset and its serial. As you can
see, my CAT control device is:
/dev/serial/by-id/usb-FTDI_FT232R_USB_UART_A600CS2N-if00-port0. And by magic
of udev this will always be the same,
regardless of when this is plugged in and where.
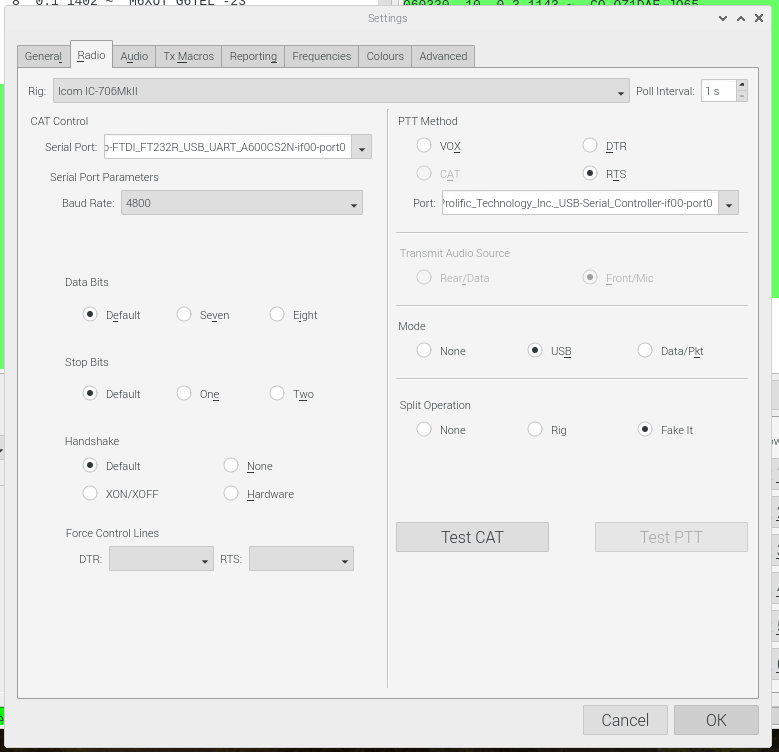
We can now set the CAT Control settings in WSJT-X’s Settings menu, under the radio tab. Enter the serial port (type it in), then pick the type of rig from the dropdown at the top and set any other relevant settings. You’ll find serial settings in the radio’s manual. For my Icom IC-706MkII all of the defaults work. Now press the Test CAT button and if all is well the rig should momentarily change frequency, showing CAT control works.
If it doesn’t work, then repeat the above and check the settings. You might
also need to make sure you are in the dialout unix group, which controls
access to serial hardware. Add yourself to the group with sudo adduser pi dialout
and logout or reboot for the changes to take effect, then try again.
You might also need to mess with your rig’s settings to get things working.
PTT setup
PTT (Push to talk) lets WSJT-X tell the rig to start transmitting, so it’s
another important part of the setup. To set up PTT, plug the next USB device
in and run dmesg -H again. Mine looks like this:
[  +3.931017] usb 1-1.3.3: new full-speed USB device number 7 using xhci_hcd
[  +0.136330] usb 1-1.3.3: New USB device found, idVendor=067b, idProduct=2303, bcdDevice= 3.00
[  +0.000016] usb 1-1.3.3: New USB device strings: Mfr=1, Product=2, SerialNumber=0
[  +0.000013] usb 1-1.3.3: Product: USB-Serial Controller
[  +0.000013] usb 1-1.3.3: Manufacturer: Prolific Technology Inc.
[  +0.105700] usbcore: registered new interface driver pl2303
[  +0.002348] usbserial: USB Serial support registered for pl2303
[  +0.003039] pl2303 1-1.3.3:1.0: pl2303 converter detected
[  +0.007570] usb 1-1.3.3: pl2303 converter now attached to ttyUSB1
This is a Prolific device. These are often fake and have a reputation for not
being as good as FTDI devices, but I know this works fine, so will press on. As
you can see above this has no serial number (maybe it’s fake, or maybe these
devices don’t have serials), but if I run ls in the by-id directory again I
can see it has still been assigned a persistent name:
pi@raspberrypi:~ $ ls /dev/serial/by-id/
usb-FTDI_FT232R_USB_UART_A600CS2N-if00-port0
usb-Prolific_Technology_Inc._USB-Serial_Controller-if00-port0
So my PTT device is
/dev/serial/by-id/usb-Prolific_Technology_Inc._USB-Serial_Controller-if00-port0
and this is what I’ll paste in the PTT section of the WSJT-X settings, after
selecting RTS in the method box. Finally, I can click Test PTT and the rig’s
TX light should glow until I click it again.
If this doesn’t work for you, try different methods (not VOX if you have a
cable) and check you’re in the dialout group.
At this point, you should have working rig control and PTT, so you are most of the way there. My settings window looks like this:
Audio time
Finally, it’s time to setup the audio. First, plug the USB audio interface in
and check dmesg -H again. Mine looks like:
[  +0.000010] usb 1-1.3.1: Manufacturer: C-Media Electronics Inc.
[  +0.014894] input: C-Media Electronics Inc. USB Audio Device as /devices/platform/scb/fd500000.pcie/
[  +0.069161] hid-generic 0003:0D8C:0014.0008: input,hidraw5: USB HID v1.00 Device [C-Media Electronic
[  +0.130344] usbcore: registered new interface driver snd-usb-audio
This is a C-Media device, cheap and cheerful with great Linux support.
At this point you should close and reopen WSJT-X, then head back into the
settings menu. Pick plughw:CARD=Device,DEV=0 for both the input and output
and exit the setting menu. My menu looks like this:

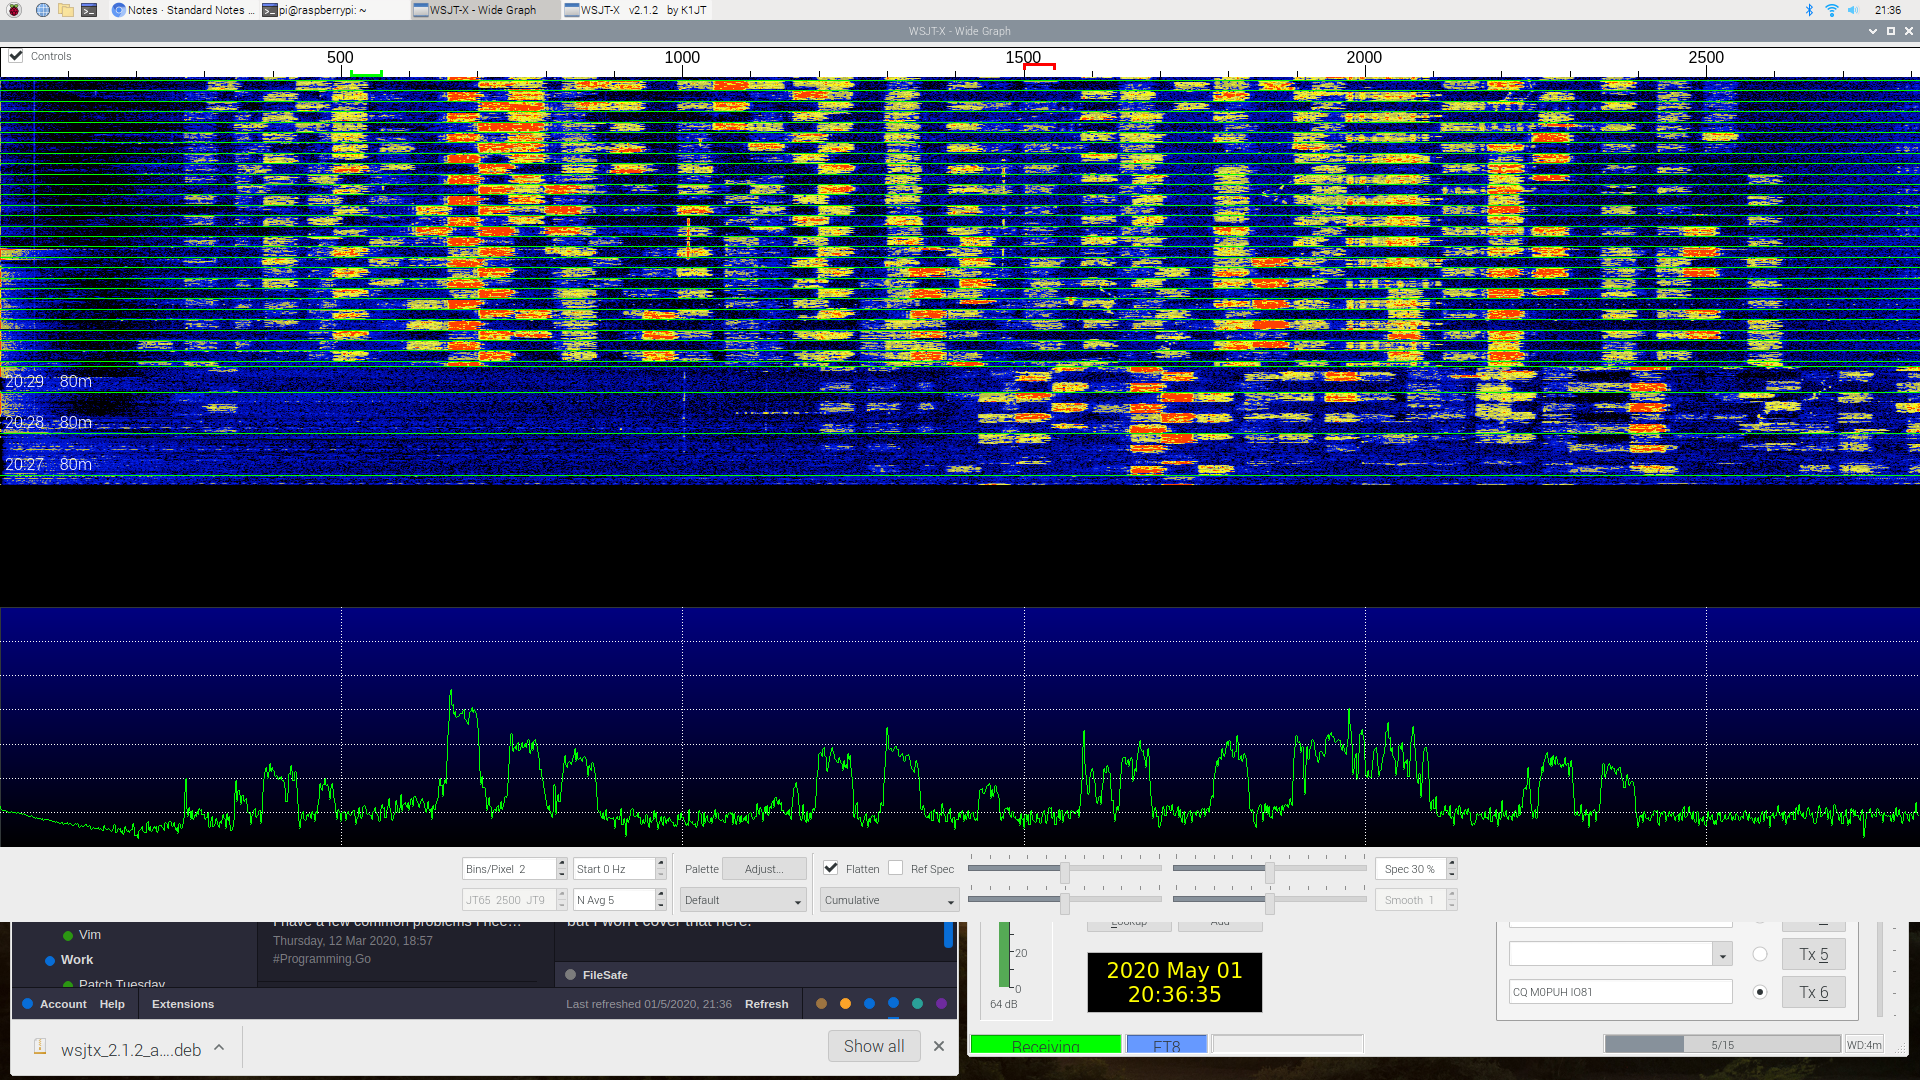
Now, leave the settings menus and pick FT8 from the mode menu. Now, plug in your audio cables – all being well your waterfall should start filling with FT8 decodes pretty quickly. If you don’t see decodes then check you can hear the lovely chimes if you turn the rig’s volume up. If you can hear the chimes then the problem is with audio input. Start by checking the cables, you might have them reversed.
You might also fine the input is overloaded, if the small level meter in WSJT-X looks like it’s red all the time them you will want to build a small attenuator as your sound card is expecting a mic level input, but I won’t cover that here.
Transmitting!
The final step is transmitting, so first up check your rig’s power level is set nice and low. Next, look on the waterfall for somewhere without too much in the way of signals (yeah right!) and shift-click to set the transmit frequency. You’ll see it update in the main WSJT-X window. Next, click Tune and WSJT-X will transmit a solid tone. You can use this tone to tune up however you would usually. I use a manual tuner and like to do it by ear as much as possible so not use the tune button for long.
Right, that’s it! You should now be ready to play with FT8! I’ll leave the rest up to you. When I was getting started I found the FT8 Operating Guide really useful. My only real tip is that you must never just click “Enable TX” and let things run their course. Always hunt around for an empty part of spectrum and hold your Tx frequency. Make sure you are an active participant and you will have a lot of fun, and see that it actually takes a bit of skill!